Fabrication and Installation
Atlas of Marble and Natural-Stone Edges and Profiles
The edge is the visible third dimension of stone. Square, chamfered, rounded, bevelled, moulded, tapered or built up, it changes the design, tactile quality, impact resistance, cost and fabrication method.
Understand the edge before selecting a profile
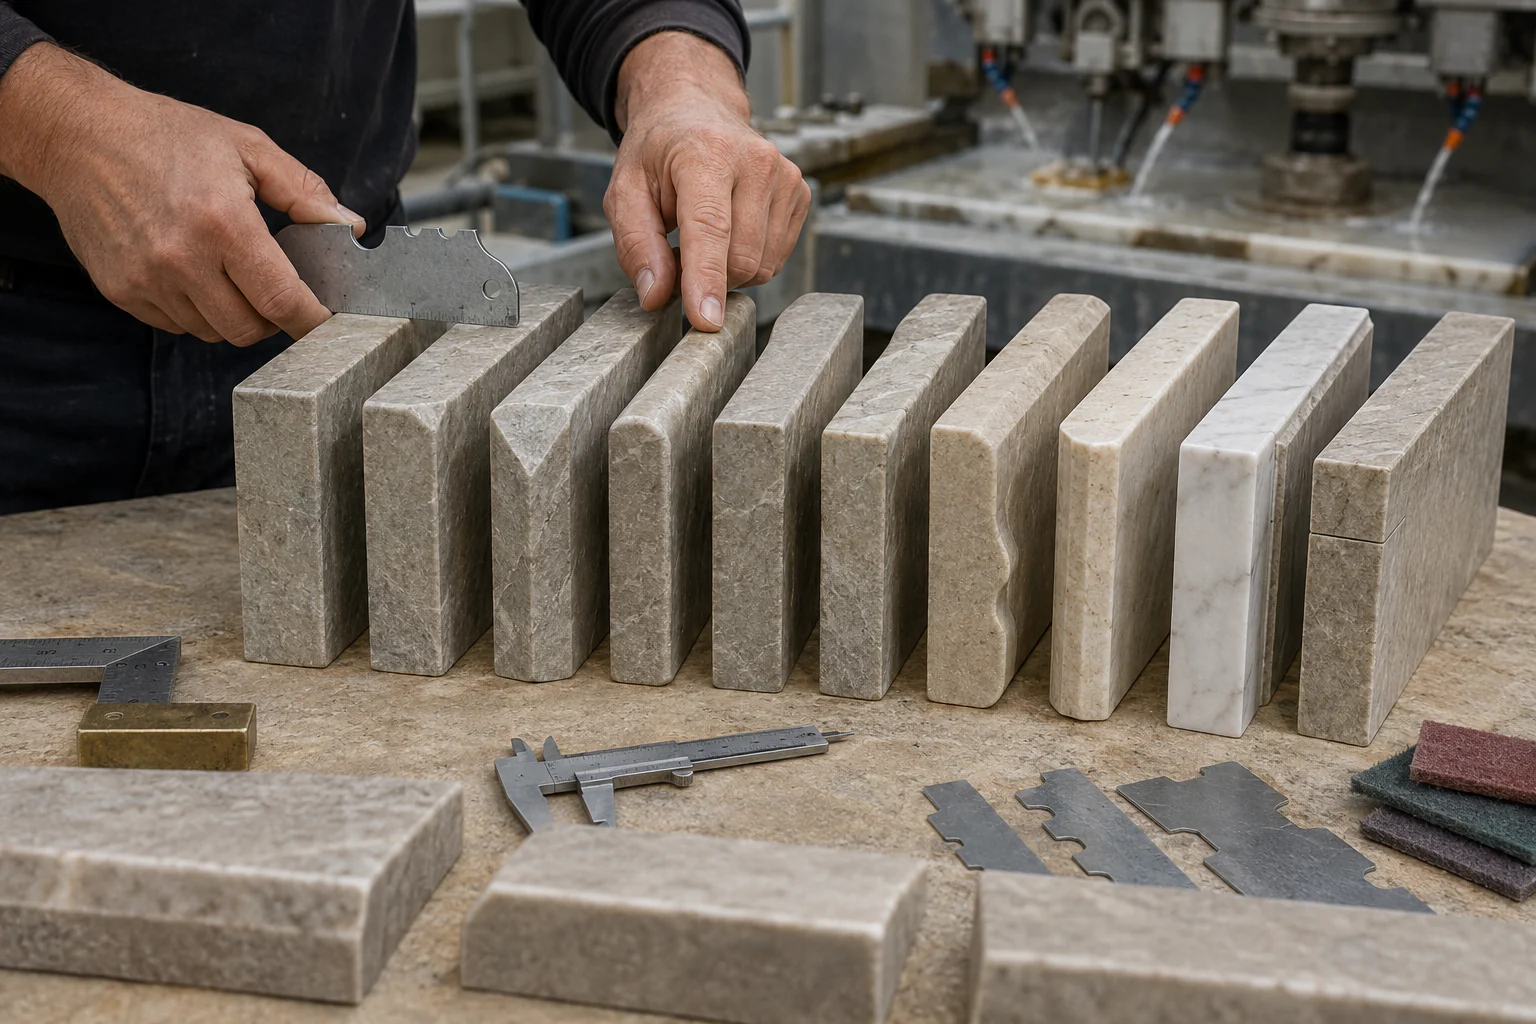
The edge is the face formed through the thickness of a slab, stair tread, worktop, shelf or panel. It becomes visible at exposed sides, around cut-outs, on returns, beneath overhangs and at joints. A project that specifies only the main surface leaves an important design decision to the workshop or installer.
An edge profile affects five qualities at once: visual expression, touch, vulnerability to impact, fabrication complexity and the way light defines the thickness. The same 20 or 30 mm slab can appear slender, substantial, soft, classical or technical depending on the selected profile.
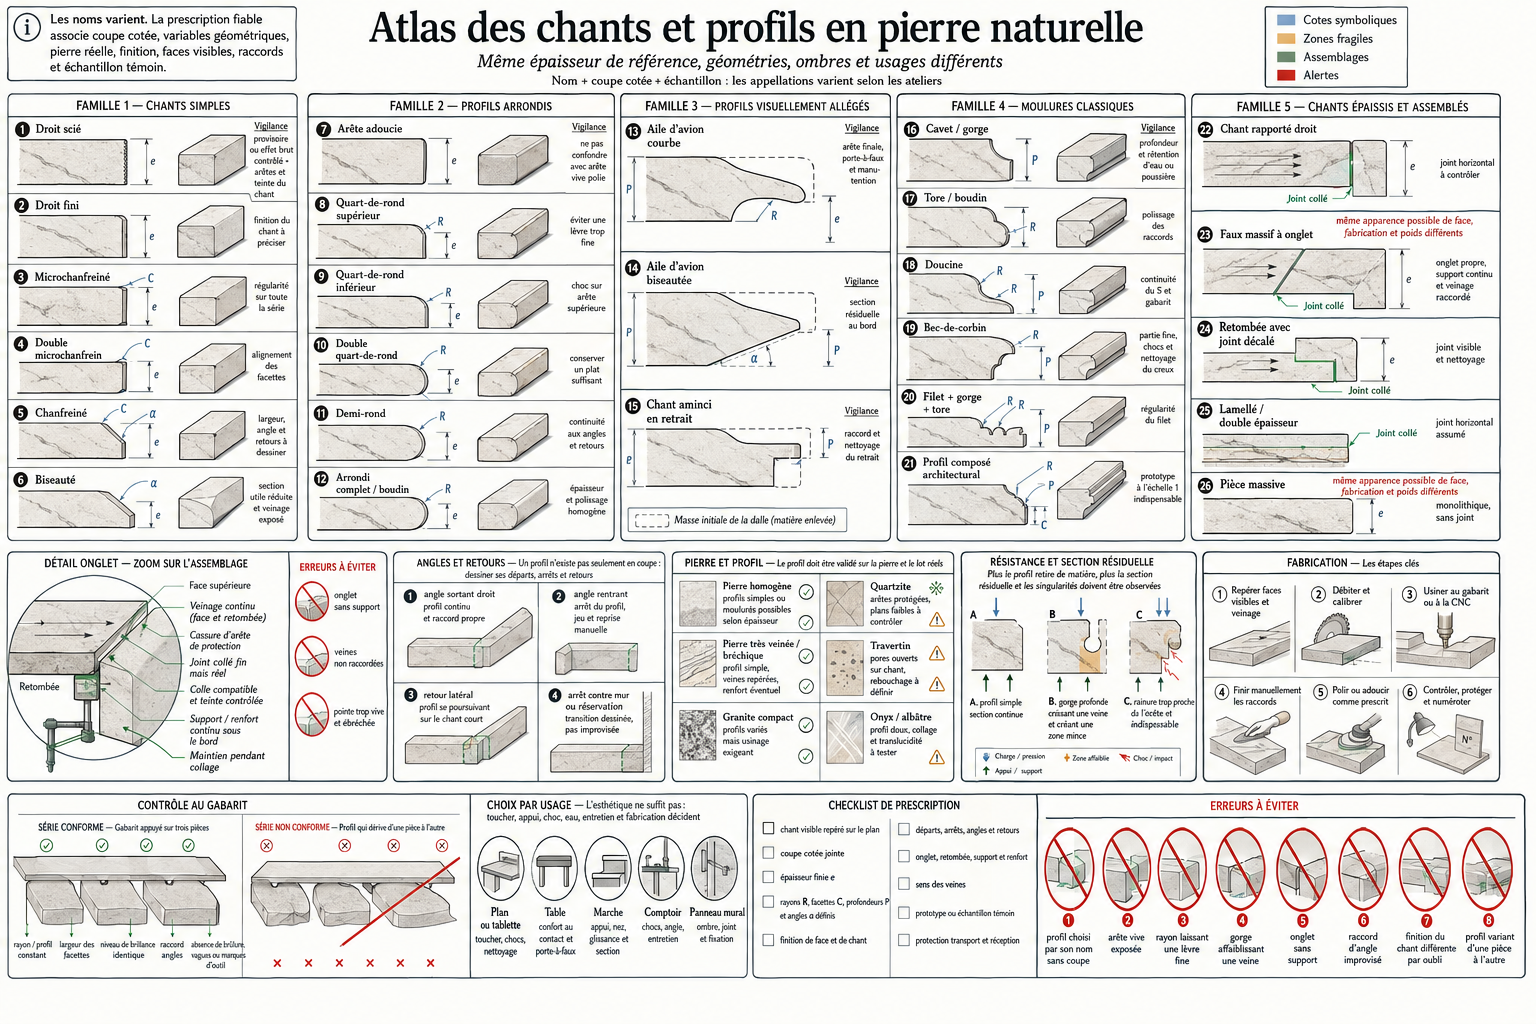
Terminology should always be supported by a dimensioned drawing or sample. Trade names vary between workshops and regions; labels such as half bullnose, ogee or shark-nose do not necessarily define the radius, depth, transition or exact faces to be worked.
Simple edge profiles
| Profile | Geometry | Visual character | Points to consider |
|---|---|---|---|
| Sawn square edge | Flat sawn face with unfinished arrises. | Raw and technical, usually an intermediate condition. | Saw marks, sharp arrises and differences in absorption or colour from the main face. |
| Polished or honed square edge | Flat face finished to match the surface or project specification. | Minimal, precise and contemporary. | Both arrises remain vulnerable unless lightly eased. |
| Micro-chamfered | A very small bevel on one or both arrises. | Almost square, but softer to touch and less vulnerable. | Chamfer size must remain consistent across every piece. |
| Chamfered | A clearly visible bevel, often close to 45 degrees. | Graphic, crisp and architectural. | Width, angle and corner transitions must be dimensioned. |
| Bevelled | An inclined face wider than a conventional chamfer. | Visually lightens the edge or creates a distinct facet. | Locally reduces the effective thickness and may expose veining. |
| Eased edge | A lightly eased and polished arris without a pronounced profile. | Understated, comfortable and versatile. | Do not confuse with a sharp arris that has merely been polished. |
Rounded edge profiles
A more rounded profile feels softer and generally tolerates contact better. A large radius does not automatically make the component stronger: it may reduce the section beside a vein, complicate internal corners and increase polishing time.
| Profile | Geometry | Common applications | Technical consideration |
|---|---|---|---|
| Quarter round | One arris is formed to a consistent radius. | Worktops, steps, shelves and vanity tops. | The radius must not leave an excessively thin lip on the opposite face. |
| Half bullnose | The full thickness forms a semicircle or similar curve. | Stair nosings, tables and traditional counters. | Corners and returns require precise fabrication to maintain continuity. |
| Double quarter round | Both arrises are rounded with a central flat face. | Handled tops, furniture and stone handrails. | Retain sufficient flat area to express the thickness and resist impact. |
| Full round | A continuous near-toroidal profile. | Solid steps and sculptural details. | Requires adequate thickness and consistent polishing. |
| Shark-nose edge | A tapered profile formed by a progressive curve or bevel. | Contemporary tables and worktops with a slender appearance. | The final arris remains vulnerable; check overhangs and handling. |
Classical mouldings and architectural profiles
Architectural mouldings are not arbitrary decoration: every curve creates a projection, shadow and transition. On strongly veined stone, the profile reveals new layers of material, so its appearance must be assessed on the actual batch rather than on a plain drawing alone.
| Profile | Composition | Intended effect | Maintenance |
|---|---|---|---|
| Ogee with projecting nose | A rounded projection combined with a recess or cove. | Cornices, steps or statement tops. | Recesses retain more dust and care products. |
| Ogee | An S-shaped curve combining concave and convex sections. | An elegant transition with classical references. | Profile continuity must be checked at every joint. |
| Cove | A concave moulding cut into the edge. | Creates a shadow line and visually lightens the piece. | Avoid depths that weaken the piece or trap water. |
| Torus or bead | A rounded convex moulding. | Substantial, soft and monumental in character. | The transition to flat areas requires careful polishing. |
| Fillet | A narrow flat band separating two curves. | Adds precision and rhythm to the profile. | Any variation in width is immediately visible. |
| Compound profile | A combination of coves, fillets, toruses and facets. | Fireplaces, feature staircases and bespoke furniture. | A template, sample and piece identification are essential. |
Built-up, laminated and mitred edges
A built-up edge creates the appearance of solid stone without using the same thickness across the entire slab. A stone strip may be laminated beneath the edge, or two pieces mitred to form a downstand. The technique is used for worktops, tables, counters, steps and cladding.
A 45-degree mitre can continue the veining and create an almost monolithic corner. It requires accurate cutting, compatible adhesive, consistent preparation and careful control of the joint colour. An overly sharp mitre is fragile, while misalignment creates a pale line or visual break.
A square laminated edge is generally more forgiving to fabricate and repair, although its joint may remain visible under certain lighting. The choice between a mitre and laminated strip should consider veining, use, impact, moisture, length, workshop access and repairability.
- Draw the complete section, not only the visible elevation.
- Define the vein direction on the main face and downstand.
- Provide continuous support or reinforcement behind the built-up edge.
- Confirm the adhesive, joint colour and compatibility with translucent or sensitive stone.
- Protect corners during transport, storage and installation.
Selecting a profile for the stone
| Stone characteristics | Generally suitable profiles | Risk to anticipate |
|---|---|---|
| Consistent marble or limestone | Honed square edge, chamfer, quarter round or thickness-appropriate moulding. | Acids, chipping at fine arrises and colour differences between face and edge. |
| Strongly veined or brecciated marble | Simple profile, controlled radius and reinforcement where required. | Opening along a vein, chipping or discontinuous pattern at joints. |
| Dense granite | Polished square edge, chamfer, rounded or solid nosing. | Fabrication and polishing time, weight and micro-chipping on fine profiles. |
| Quartzite | Simple profile with protected arrises. | Hardness, weakness planes, chipping and difficult manual repairs. |
| Travertine | Square, honed, chamfered or moderately rounded. | Open voids on the edge, filling and texture differences. |
| Onyx or alabaster | Soft profile, adequate thickness and considered lighting. | Fragility, visible adhesive through translucent stone, fissures and fabrication heat. |
Fabrication, inspection and tolerances
Profiles may be produced by hand, grinding tools, profiling machines, CNC equipment or a combination of machining and hand finishing. CNC improves repeatability but cannot replace skilled assessment of the stone or final finishing at corners, returns and cut-outs.
Inspect profiles with templates, straightedges, raking light and comparison between pieces. Check radii, facet widths, continuity, absence of burning, consistent polish, corner transitions and finished thickness. Small repeated deviations become highly visible when a series of pieces is aligned.
Tolerances should reflect the application and profile. Complex mouldings require an approved reference sample. Adjacent visible edges must have compatible thickness and finish. Bonded or concealed edges do not require the same visual standard as exposed edges seen in light and touched in use.
- Provide a dimensioned drawing, section, radius, finish and identification of visible faces.
- Approve a full-size prototype for every special profile.
- Identify open veins before fabrication.
- Inspect external and internal corners separately.
- Allow for hand finishing and protect edges after inspection.
Repairing a chipped edge
Repair begins by identifying the cause: local impact, an overly sharp arris, open vein, failed bonding, substrate movement or handling. Filling the chip without addressing the cause often leads to further damage.
A specialist may repair a small chip with compatible filled and tinted resin, then shape and polish it. Retaining the broken fragment may produce a better match than reconstruction. On historic mouldings, preserve the profile and evidence of age without unnecessarily enlarging the repair.
A heavily exposed arris may be eased slightly during restoration if this does not alter the design. For major damage, a stone insert, indent repair or replacement may be preferable to a large, conspicuous or overly rigid resin repair.
Edge-profile specification checklist
- Identify every visible edge on the drawings and stone layout.
- Name the profile and include a dimensioned section showing radii and facets.
- State the face finish, edge finish and required sheen.
- Describe corners, returns, joints, cut-outs and moulding stops.
- Confirm the finished thickness and any laminated or built-up edges.
- Select the profile for the actual stone, veining and expected loads.
- Define the approved sample, tolerances and acceptance criteria.
- Plan protection, transport, vertical storage and installation sequence.
Key concepts
From the Marbre Import blog
Related articles and completed projects
Marble Staircases: Seven Advantages
Explore an additional guide, example or completed project from Marbre Import.
Continue reading
Related guides
Historical Atlas of Marble Styles, Periods, Monuments and Uses
Understanding marble in Antiquity, Rome, Byzantium, the Renaissance, Baroque, Art Deco and modern design supports more informed and culturally appropriate specification.
Natural-Stone Staircases, Steps, Nosings and Accessibility
A marble or natural-stone staircase brings together appearance, safety, slip resistance, impact, wear, visual legibility, walking comfort, thickness, fabrication and maintenance. It must be designed as a complete assembly, not simply as a sequence of slabs.
Advanced Stone Cutting, Carving and Stereotomy
From raw block to completed work: reading the material, cutting, setting out, tools, hand carving, machinery, edges, arches, vaults, stairs, stone assembly, tolerances and workshop inspection.
Digital Fabrication: CNC, Waterjet Cutting, Engraving and Workshop Inspection
CNC, waterjet cutting, drilling, engraving and digital files enable high precision but require defined limits for radius, thickness, workholding, hand finishing and material inspection.
Marble Furniture, Decorative Objects and Bespoke Pieces
Marble tables, tops, counters, consoles, basins, lighting, shelves and signature objects require careful consideration of weight, edges, support, staining, scratching, stability, maintenance and presentation of the material.
Natural Stone in Kitchens, Bathrooms and Worktops
Wet and food-preparation areas are frequent sources of misunderstanding. Marble, quartzite, granite, travertine and onyx must be assessed in relation to the application, finish, protection and maintenance expectations.